
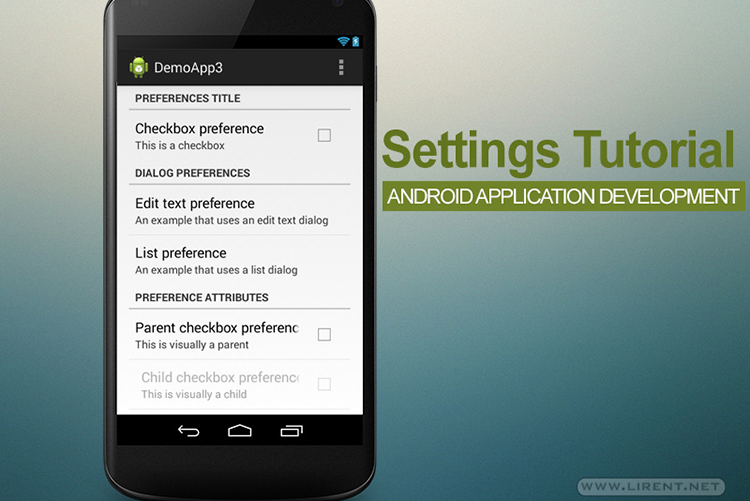
Settings inside your app allow uses to modify features and behaviors. When application is relaunched certain information are still stored. Of course we can provide a default value for each settings voice.
To provide settings for your app, we can use Preference APIs to build an interface that’s consistent with the user experience in other Android apps.
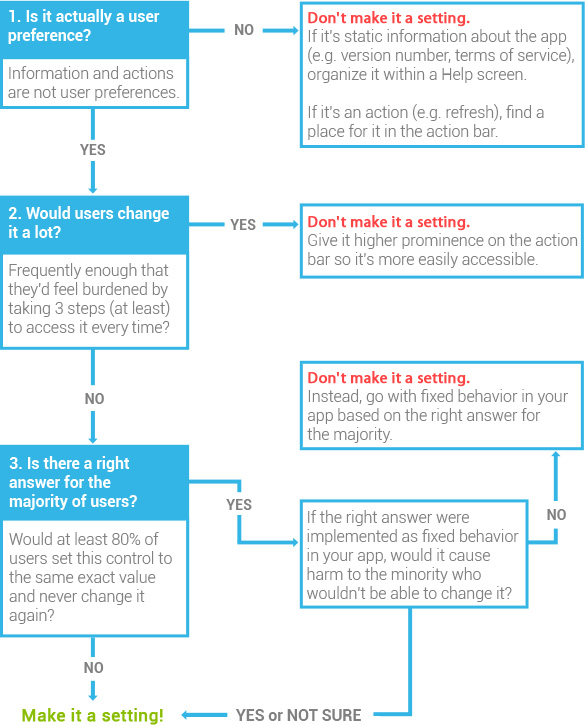
In case you are asking if you need or not a voice to be inside settings page, this graph can help you decide:
Settings Activity
Google is pushing developers to use the PreferenceFragment as extended class for Settigns. This support only Android 3.0 and higher. If you want to support also older versions use PreferenceActivity but we will have a warning for a deprecated method for addPreferencesFromResource.
Alt+Ins and select New Java Class. Type SettingsActivity for the class name and confirm. Extend to PreferenceFragment and overwrite onCreate(...) method. The only thing to do in this class is adding the xml resouce file.
addPreferencesFromResource(R.xml.preference);
On next step let’s fix the xml warning.
Preferences XML
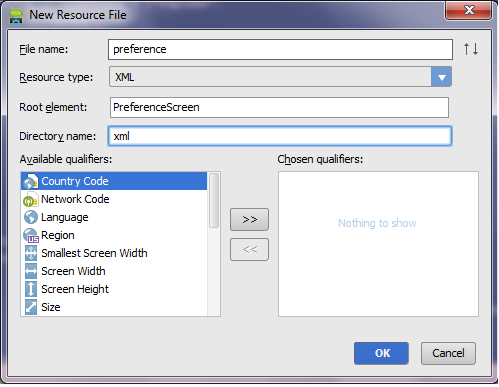
Right click your res/ directory and select New Resource File. For File Name type preference, for Resource Type select XML from dropdown list, for Root Element type PreferenceScreen and for Directory Name type xml.
Now we have the preference.xml file, the UI for the user to interact with. Let’s add some voices to our settings.
<?xml version="1.0" encoding="utf-8"?>
<PreferenceScreen xmlns:android="http://schemas.android.com/apk/res/android" >
    <PreferenceCategory
        android:title="@string/inline_preferences">
        <CheckBoxPreference
            android:key="checkbox_preference"
            android:title="@string/title_checkbox_preference"
            android:summary="@string/summary_checkbox_preference" />

    </PreferenceCategory>
    <PreferenceCategory
        android:title="@string/dialog_based_preferences">

        <EditTextPreference
            android:key="edittext_preference"
            android:title="@string/title_edittext_preference"
            android:summary="@string/summary_edittext_preference"
            android:dialogTitle="@string/dialog_title_edittext_preference" />

        <ListPreference
            android:key="list_preference"
            android:title="@string/title_list_preference"
            android:summary="@string/summary_list_preference"
            android:entries="@array/entries_list_preference"
            android:entryValues="@array/entryvalues_list_preference"
            android:dialogTitle="@string/dialog_title_list_preference" />

    </PreferenceCategory>
    <PreferenceCategory
        android:title="@string/preference_attributes">

        <CheckBoxPreference
            android:key="parent_checkbox_preference"
            android:title="@string/title_parent_preference"
            android:summary="@string/summary_parent_preference" />

        <!-- The visual style of a child is defined by this styled theme attribute. -->
        <CheckBoxPreference
            android:key="child_checkbox_preference"
            android:dependency="parent_checkbox_preference"
            android:layout="?android:attr/preferenceLayoutChild"
            android:title="@string/title_child_preference"
            android:summary="@string/summary_child_preference" />

    </PreferenceCategory>
</PreferenceScreen>
Settings Button
Instead of creating a button, we will use the default setting option on top Android Menu.
To do so, we have to override the onOptionsItemSelected method and add the settings Fragment. Please note, that we are supporting Android 3.0 or higher versions.
@Override
public boolean onOptionsItemSelected(MenuItem item) {
	int id = item.getItemId();
	if (id == R.id.action_settings) {
		getFragmentManager().beginTransaction()
				.replace(R.id.container, new SettingsActivity())
				.commit();

		return true;
	}
	return super.onOptionsItemSelected(item);
}
Now let’s run our Android Demo3 app and test some settings. For questions or suggestion use the comment form below.
Note: if Fragments are overlapping, add addToBackStack(null) after calling replace.


is there any way i could get the source code?
Above is the code