Are you looking to build your first web application and wondering where to start? Spring Boot, a powerful framework for Java, offers a simplified and efficient way to create robust and scalable web applications. In this guide, we’ll walk you through the process of building your first web application with Spring Boot, transforming you from a novice to an expert.
Spring Boot is part of the larger Spring framework, widely used for building enterprise-level applications.
Prerequisites to run your first Web Application with Spring Boot
- Java Development Kit (JDK) 8 or later
- An IDE like IntelliJ IDEA, Eclipse, or VS Code
- Apache Maven or Gradle for dependency management (Maven is used in this guide)
Step 1: Setting Up Your Development Environment
Using Spring Initializr with IntelliJ (only Ultimate Edition)
- Open IntelliJ IDEA and navigate to
File>New>Project. - In the
New Projectwindow, selectSpring Initializrfrom the left sidebar. - Fill in the following details:
- Project SDK: Ensure it’s set to your installed JDK.
- Language: Java
- Spring Boot: Select the latest stable version
- Project Metadata: Fill in your Group, Artifact, Name, Description, and Package Name
- Click
Next, then add the necessary dependencies. For this basic web application, addSpring Web, Spring Data JPA, Lombok and H2 database. - Click
Finish. IntelliJ will generate and open your new Spring Boot project.
Check out these Intellij Shortcuts to boost your productivity.
Using Spring Initializr:
- Go to Spring Initializr.
- Select the following options:
- Project: Maven Project
- Language: Java
- Spring Boot: Choose the latest stable version
- Project Metadata: Fill in your Group, Artifact, and other details
- Dependencies: Add Spring Web, Spring Data JPA, Lombok and H2 database.
- Click “Generate” to download the project, then extract and open it in your IDE.
Step 2: Creating a Real-World Example: Task Manager Application
Let’s build a simple Task Manager application. This application will allow users to create, read, update, and delete tasks.
Step 2.1: Creating the Task Entity
- Create a new package under
src/main/java/net/lirent/appcalledmodel. - Create a new Java class called
Taskin themodelpackage:
package net.lirent.app.model;

import jakarta.persistence.Entity;
import jakarta.persistence.GeneratedValue;
import jakarta.persistence.GenerationType;
import jakarta.persistence.Id;
import lombok.Data;

@Entity
@Data
public class Task {
    @Id
    @GeneratedValue(strategy = GenerationType.AUTO)
    private Long id;
    private String title;
    private String description;

    // Getters and setters by Lombok
}
If you are using Java 21, using Records is even easy, you don’t have to add Lombok or add getters and setters.
@Entity
public record Task(
        @Id @GeneratedValue(strategy = GenerationType.AUTO) Long id,
        String title,
        String description
) {}Using Java Record:
Step 2.2: Creating the Task Repository
- Create a new package under
src/main/java/com/example/democalledrepository. - Create a new Java interface called
TaskRepositoryin therepositorypackage:
package net.lirent.app.repository;

import net.lirent.app.model.Task;
import org.springframework.data.jpa.repository.JpaRepository;

public interface TaskRepository extends JpaRepository<Task, Long> {
}
Step 2.3: Creating the Task Controller
- Create a new package under
src/main/java/net/lirent/appcalledcontroller. - Create a new Java class called
TaskControllerin thecontrollerpackage:
package net.lirent.app.controller;

import net.lirent.app.model.Task;
import net.lirent.app.service.TaskService;
import org.springframework.beans.factory.annotation.Autowired;
import org.springframework.web.bind.annotation.*;

import java.util.Optional;

@RestController
@RequestMapping("/tasks")
public class TaskController {

    @Autowired
    private TaskService taskService;

    @GetMapping
    public Iterable<Task> getAllTasks() {
        return taskService.findAll();
    }

    @GetMapping("/{id}")
    public Optional<Task> getTaskById(@PathVariable Long id) {
        return taskService.findById(id);
    }

    @PostMapping
    public Task createTask(@RequestBody Task task) {
        return taskService.save(task);
    }

    @PutMapping("/{id}")
    public Task updateTask(@PathVariable Long id, @RequestBody Task taskDetails) {
        Task task = taskService.findById(id).orElseThrow();
        task.setTitle(taskDetails.getTitle());
        task.setDescription(taskDetails.getDescription());
        return taskService.save(task);
    }

    @DeleteMapping("/{id}")
    public void deleteTask(@PathVariable Long id) {
        taskService.deleteById(id);
    }
}
Step 2.4: Creating the Task Controller
Create a new package under src/main/java/net/lirent/app called service.
package net.lirent.app.service;

import net.lirent.app.model.Task;
import net.lirent.app.repository.TaskRepository;
import org.springframework.stereotype.Service;

import java.util.Optional;

@Service
public class TaskService {

    private final TaskRepository taskRepository;

    public TaskService(TaskRepository taskRepository) {
        this.taskRepository = taskRepository;
    }

    public Iterable<Task> findAll() {
        return taskRepository.findAll();
    }

    public Optional<Task> findById(Long id) {
        return  taskRepository.findById(id);
    }

    public Task save(Task task) {
        return taskRepository.save(task);
    }

    public void deleteById(Long id) {
        taskRepository.deleteById(id);
    }
}
Step 2.5: Configuring the Database
- Add dependencies for Spring Data JPA and H2 (for an in-memory database) to your
pom.xml:
<dependency>
    <groupId>org.springframework.boot</groupId>
    <artifactId>spring-boot-starter-data-jpa</artifactId>
</dependency>
<dependency>
    <groupId>com.h2database</groupId>
    <artifactId>h2</artifactId>
    <scope>runtime</scope>
</dependency>- Configure your database connection in
src/main/resources/application.properties:
spring.datasource.url=jdbc:h2:mem:testdb
spring.datasource.driverClassName=org.h2.Driver
spring.datasource.username=sa
spring.datasource.password=secret
spring.jpa.database-platform=org.hibernate.dialect.H2Dialect
spring.h2.console.enabled=true
Step 3: Running Your Application
- In the
src/main/java/net/lirent/appdirectory, locate the main class,TaskApplication.java. This class is annotated with@SpringBootApplication.
package net.lirent.app;

import org.springframework.boot.SpringApplication;
import org.springframework.boot.autoconfigure.SpringBootApplication;

@SpringBootApplication
public class TaskApplication {

    public static void main(String[] args) {
        SpringApplication.run(TaskApplication.class, args);
    }
}- Right-click on
TaskApplication.javaand selectRun.
IntelliJ will compile and run your Spring Boot application. You should see output indicating that the application has started on the default port (8080).
Step 4: Testing Your Application
Open your terminal window or a tool like Postman, and test the following endpoints:
- Create a new task:
CURL --request POST --url 'http://localhost:8080/tasks' --data '{ "title": "Task 1", "description": "Description 1" }' --header 'Content-Type: application/json'. - Update task 1:
CURL --request PUT --url 'http://localhost:8080/tasks/1' --data '{ "title": "Task 1 Updated", "description": "Description Updated" }' --header 'Content-Type: application/json'. - Get a task by ID:
CURL GET http://localhost:8080/tasks/{id} - Get all tasks: CURL
GET http://localhost:8080/tasks - Delete task 1: CURL
DELETE http://localhost:8080/tasks/1
Add Swagger dependency
Add the following Swagger dependencies to your pom.xml and restart the application:
<dependency>
	<groupId>org.springdoc</groupId>
        <artifactId>springdoc-openapi-starter-webmvc-ui</artifactId>
	<version>2.3.0</version>
</dependency>
Open your web browser and navigate to http://localhost:8080/swagger-ui/. You should see the Swagger UI interface, which allows you to interact with your API endpoints.
You can test the following endpoints directly from the Swagger UI:
- Get all tasks:
GET /tasks - Get a task by ID:
GET /tasks/{id} - Create a new task:
POST /tasks - Update a task:
PUT /tasks/{id} - Delete a task:
DELETE /tasks/{id}
Here is the full list of dependencies from pom.xml file:
<dependencies>
		<dependency>
			<groupId>org.springframework.boot</groupId>
			<artifactId>spring-boot-starter-web</artifactId>
		</dependency>
		<dependency>
			<groupId>org.springframework.boot</groupId>
			<artifactId>spring-boot-starter-data-jpa</artifactId>
		</dependency>

		<dependency>
			<groupId>org.springdoc</groupId>
			<artifactId>springdoc-openapi-starter-webmvc-ui</artifactId>
			<version>2.3.0</version>
		</dependency>

		<dependency>
			<groupId>com.h2database</groupId>
			<artifactId>h2</artifactId>
			<scope>runtime</scope>
		</dependency>
		<dependency>
			<groupId>org.projectlombok</groupId>
			<artifactId>lombok</artifactId>
			<optional>true</optional>
		</dependency>
		<dependency>
			<groupId>org.springframework.boot</groupId>
			<artifactId>spring-boot-starter-test</artifactId>
			<scope>test</scope>
		</dependency>
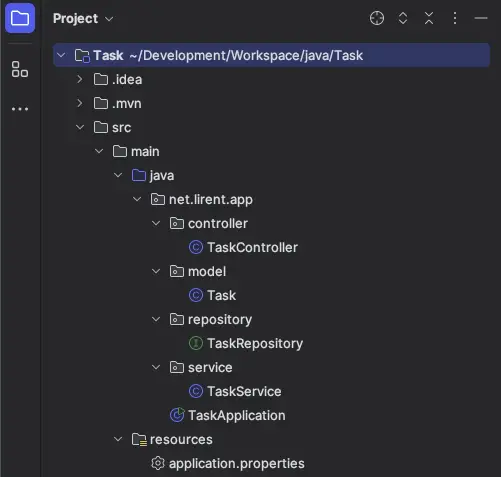
Here is how you project and database entry should look like:
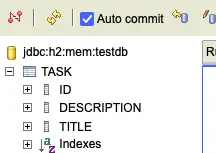
By following this guide, you’ve set up a basic Task Manager application, created entities, repositories, and controllers, and learned how to expand your application with additional features. Let us know in the comments below you result or if you have any question.
As exercise write Unit tests and IT tests for this web application with spring Boot.

