
You never know where and when you may need to pick a lock. You may just need to get into your house or car, or you may be captured by insurgents in a foreign nation. Whatever the case may be, this is the Beginners Guide To Lock Picking. With practice and time, your skills will improve.
Even if you know nothing about lock picking, if you follow the steps outlined here, you should be able to pick your first lock open less than an hour from now. You’ll also learn the best places to get the tools you’ll need (and how to make them if you don’t want to buy them).
Lock Picking Instructions
Step 1: Purchase a practice lock
Now you’re ready to purchase a practice lock. Odds are, you’ll end up destroying this lock, so don’t go for anything fancy, or anything you’ll want to keep. Walk into any department store and buy a medium priced dead-bolt. A dead-bolt is the easiest lock to disassemble, so don’t stray away towards any other type. Also, the really cheap locks can be hard to open even with the key, so trying to pick them is even worse. The brands you want to look for are either generic names, or Kwikset. Stay away from Schlage, it’s more difficult to pick due to the shape of the ward. The lock you purchase should be a five pin tumbler (you would have a hard time finding a dead-bolt that isn’t).
Step 2: Remove all but one pin from your lock
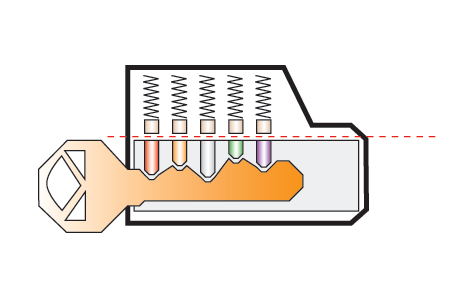
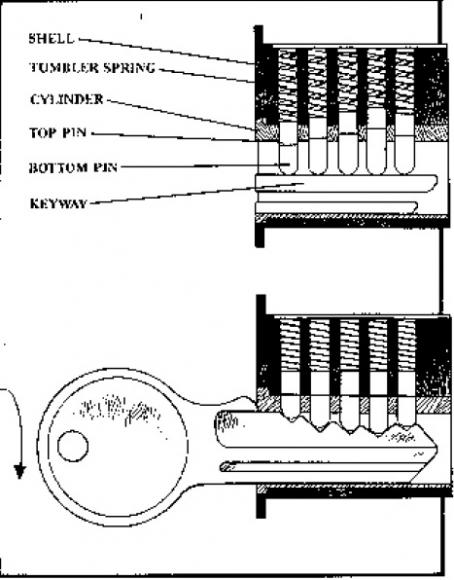
Attempting to pick a five pin tumbler is way too difficult for someone just starting out. So you’ll want to make your job easier by removing all but one pin from your lock. This will give you a feel for what it’s like to pick a lock so you’ll know it when it happens. Taking the pins out of a lock without destroying it isn’t intuitive, so I’ve put together a guide showing how to do it. You’ll want to leave the first pin (the pin closest to the front of the lock) in. This will allow you to see what you’re doing.

Step 3: Get a torque wrench and a pick
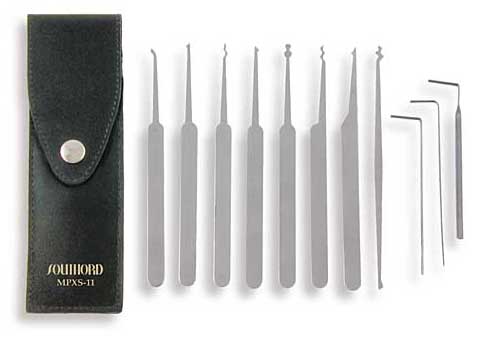
You probably don’t own a lock pick set, so you’re going to have to make due with household items. Here is a list of a few items which will serve you well as a torque wrench:
* Allen Wrench. This is the best tool. If you have a grinder, pick one which is a size or two too big to enter the key-way, then grind it’s width down just enough to enter the key-way. If you don’t have a grinder, use a file, or use a different item for a torque wrench. (Using one which fits exactly into the key-way will only work for a while, eventually you’ll wear out the key-way).
* Screwdriver. Use a very small one, but not so small that it doesn’t touch the wards. You’ll want to make it as effortless as possible to apply turning pressure.
* Paper Clip. Find a sturdy paper clip and straighten it out. Then bend a loop just big enough to fit into the bottom of the key-way. Then bend the remaining wire about 80-90 degrees to the loop.
Here are some tools which may be used as a pick (most of these tools will work well for picking the first pin, but you’ll need to upgrade after you’ve added a pin or two):
* Allen Wrench. Pick the smallest one you can find.
* Screw Driver. Again, pick the smallest one you can find.
* Paper Clip. You’ll need one strong enough to withstand the force of the springs.
* Straight Pin. File the point off so you don’t stick yourself.
* Safety Pin. Again, file the point off.
* Staple. You’ll need one strong enough to withstand the force of the springs. Straighten it out so it’s flat, then turn it edgewise when picking.
Step 4: Pick the lock
And now the moment of truth; you’re ready to pick your first lock. Basically, just do what you learned back in step1 and step 2. I find it easiest when the lock is turned upside down. Then place your finger on the torque wrench, and let gravity do the work (you may need to press down just a little bit). Then take your pick and lower the first pin down very slowly. Once you hit the the sheer line, you’ll know it. The plug will turn, and you’ll be amazed as to how easy it was and how little time it took. Return the plug back to the locked position and repeat until you’re comfortable.
Step 5: Add some more pins and try again
Now that you know what it feels like, add another pin back in (add pin two, just behind pin one). Now when you get a pin picked, you won’t know for sure, not until you try to pick the second one. Practice, Practice, Practice. You’ll want to become very proficient at picking two pins before stepping up to three. If you try to advance too quickly, you’ll hinder your learning. So take your time. If you practice casually, it will probably take you three to five days to work your way up to five pins. Also, you’ll need better tools to pick more than three pins, so order your pick set and practice with two and three pins until your order arrives.
Step 6: Continue Learning with Recommended Readings
First Reading
My first recommendation is to read the MIT Guide to Lock picking by Theodore T. Tool. Although the document is rather old (1987), all of the information within it is still valid, and will apply to the majority of the locks you run into on a daily basis. It gives a very good introduction on how to pick pin tumbler locks (the type used on the door to your house). There is simply no better place to start.
Second Reading
After you’ve read the MIT Guide, I encourage to you read the Secrets of Lock picking page. This page gives an overview of many different types of locks and will help you identify the different types as you encounter them. This site doesn’t give as much detail about each lock as the MIT Guide, so I recommend reading the MIT Guide first. For now, just concentrate on the wafer tumbler lock information at this site. The other lock types aren’t very common, so come back and read those sections after you’ve picked some pin and wafer tumblers.
[youtube pwTVBWCijEQ]
Post By Gunslot


another video…
http://www.youtube.com/watch?v=XQDR-DBQRfI